Saturday, May 9, 2009

OATS-BUTTERMILK KANJI WITH SOME INTERESTING TOPIC


The week was quite enjoyable with the happy occasions, birthday and wedding anniversary on 5th and 6th of May. Mom has come to shower her blessings on us. It was really a blissful day indeed.

As I have told already, today’s topic will mostly highlight on WEIGHT LOSS. Shedding weight is one of the most favorable things everyone wants to do but it needs some determination and enthusiasm. Weight loss will be no more a dream once we are determined about that. Next comes the three mantras; reasonable diet, plenty of exercises, and a good amount of water intake.

Many of us want to lose weight at a quick and rapid pace but I don’t think there is really an easy path. It is easier to gain weight rather than losing it. But if we follow some restrictions in diet, as I said before, weight loss will no more be a dream. Diet restrictions in the sense, I didn’t mean of starving for anything. It should be of balanced one with lot of veggies, carbohydrate, protein, fat, vitamins, mineral salts, and fibre, however, dinner should be very light. It can be of anything like salads, whole wheat bread, rotis, parathas, fruits, oatmeal, etc.
Diet alone will definitely not help you to lose the optimum amount of fat accumulated but also an effective exercise program needs to be put in place. Aerobics, swimming, and cardiovascular exercises play an efficient role in achieving the optimum weight loss. Both exercise and diet are in same compartment that helps shedding the excessive fat accumulation.

Next the third one which is quite easier, good amount of water intake. It is recommended to drink at least eight glasses of water a day. It helps in flushing out toxins from the fat cells which are stored in fat tissue and released into the bloodstream.

Hope the above information will be quite useful for those who want to go for the weight loss. I am not an expert but I have shared my experience.

Coming to the recipe, Oats-Buttermilk kanji, this is a perfect and wholesome breakfast/dinner which can be prepared in jiffy. I was not much a liker of oats but this one I don’t mind to take even daily.

INGREDIENTS:

Oats – 1 cup

Buttermilk – 3 glasses (increase more if you desire)

Asafoetida – a pinch

Coriander and curry leaves – few

Salt – to taste


METHOD:

· Pressure cook Oats with two cups of water for 2 to 3 whistles.

· Grind curry leaves and coriander leaves to a coarse paste. Addition of ginger to this is purely optional.

· Once pressure is released, add the desired amount of buttermilk, salt, asafoetida, and the ground coarse paste.

· Can be served both warm or cool.

This goes to Mahimaa's 15-minute event event along with tomato-brinjal sambar.

Sunday, April 26, 2009

VEG BIRYANI – A BOWL FULL OF GOODNESS

Some of my readers have enquired me about the secrets of weight loss. Definitely, I will share the tips in my forthcoming posts...

Coming to the recipe I am posting today, Veg Biryani, everybody has their own way in preparing this but my mind flashes back to the good old days about learning this recipe…

During my childhood days, biryani’s and pulao’s are not much familiar among vegetarian’s and it is considered to be a nonvegeratian dish..When my mom first heard about this from our neighbor aunty, she was very much excited and wanted to experiment this at home. However, Dad was against to all this masala spices and he strongly rejected it. Hence, mom tried to experiment this with us..When she first prepared, she took a long time in preparing this, even now she says that, but the final outcome was liked by us. She was very happy as she is feeding us with a bowl full of goodness (with veggies, ghee)…Dad was rigid and never attempted to taste that and mom prepared for him some other traditional dish. That was the first time I had my first Veg Biryani (I suppose it was during my 10th or so)..Even now, dad never attempts to try this..

After that, she prepares this specially for us whenever dad is out of station or not at home..When I started experimenting my cooking skills, I slowly collected the recipe of the Veg Biryani from my mom’s friends..Everyone had their own way..I combined whatever I liked and started preparing my own way..It was very much liked by my mom and my brother. I prepare this whenever my cousins or guests come home for vacation…Mom will do the cutting part and will leave the kitchen to me.. There my confidence level and cooking skill started increasing. ..
Here’s the way how I prepare this..
INGREDIENTS:

Basmatic Rice – 2 cups

Mix of vegetables – 2 cups (carrot, beans, potatoes, green peas, corn)

Onion – 1

Mint leaves - few

Red chili powder --- 1 tea sp

Cloves - 2-3

Bay leaf – 1

Cinnamom – 1 inch stick

Ghee --- 4 to 5 tbp

Coriander leaves – few

Coconut milk (optional) – As required

Salt to taste

Oil – As required.


DRY ROAST AND GRIND (1)

Cloves – 3

Cinnamom – 1 inch stick

Saunf/fennel seeds – 2 tsp

Cumin seeds – 1 tsp

Peppercorns – 10

Star anise – 1


TO GRIND (2)

Tomatoes – 2 medium or big size

Ginger – 1/2 inch piece

Garlic flakes – 4 to 5

Green chilies –5 to 6

Mint leaves – handful

METHOD:

· Wash and drain the basmati rice and keep aside for 15 minutes.

· Dry roast the ingredients given in grind (1) section and keep aside. This will be a dry masala powder. I strongly feel that this powder only makes my briyani very aromatic and flavorful.

· Grind all the items given in grind (2) list to a smooth paste adding little water.· Heat pan with some oil, add cinnamom stick and bayleaf, allow them to sizzle, add mint leaves, then the ground masala powder. Then add the ground masala paste and fry till the raw smell goes.

· Then add the onions and mix well. When the onions turn light brown, add the veggies and salt. Mix well and keep in low flame for about 5 minutes. · When the veggies are half cooked, add the basmati rice and double the amount of coconut milk/water or a combination of both coconut milk and water, and chilly powder at last. Mix well. Pressure cook for two whistles.

· Once the pressure is released, add ghee and coriander leaves and mix gently.

· Now the aromatic biryani is ready to serve and can be served with any raita or chips.

I am dedicating this recipe to my beloved brother. He is in US now and it has been a long time I made this for him..Through blog, I would like to share this recipe with him.

Tuesday, April 21, 2009

TOMATO - BRINJAL SAMBAR FOR IDLI AND DOSA

It has been a long time I posted the earlier one. My system crashed due to virus and all data got erased, could not take the backup. I have gone to office and worked from there until the problem is sorted out. So could not visit any of your blogs and missed your delicious dishes but I am sitting up late today and planning to catch up all the missed ones all at once now as the system has been formatted and it is behaving like a brand new system now..

Well, I found some interesting events are going on here…Mahimaa’s 15-minute cooking, Deesha’s South Indies, and EC’s Side dish event…I am sure these events will really be helpful for each and everyone of us and we will get to know variety of tastes…In that case, I think we all are very lucky as we have become a part of this wonderful blogging world, isn’t it?. Blogging is making us a super chef at our home…


Coming to the recipe, most of the weekdays, the breakfast in my home will be mostly either idli or dosa..I rarely go for pongal as it will make me doze off during office hours and avoid fried items like poori, I suppose I had my last poori sometime back one year ago… Making side dish for this regular idli and dosa is really a head breaking task for most of us…Sometime back, Chitra of Ratatouille - Any one can cook has posted a tomato-brinjal-sambhar for idli and dosa. I was very much attracted to this one and I tried it immediately the next day. I am thrilled with the outcome. It has come out wonderful. TH loved this one and was very much pleased. In this short time, I have made this several times. Nowadays, this has become a routine at home. Really, she has done me a favor by posting this one. Thanks Chitra for sharing a wonderful recipe and I am sure you will do more favors to me like this in coming days…

I made slight variations after the trial period is over and I am quite delighted with the outcome.

INGREDIENTS:

TOMATO – 5 medium size

Brinjal – 4 to 5 medium size

Red chilies – 5 to 7

Toor dal – 1 small cup

Mustard seeds – 1 tsp

Urad dal – 1 tsp

Bengal gram – 1/2 tsp

Onion – 1 big size (finely chopped)

Curry leaves and coriander leaves – few

Turmeric powder – 1/2 tsp

Asafoetida – 1/2 tsp

Salt – As required

Oil – 1 tsp

METHOD:

· Pressure cook toor dal and tomato-brinjal-red chilies in two separate bowls for four whistles.

· Grind the tomato-brinjal mixture to a smooth paste once it cools down.

Heat kadai/pan with a tsp of oil and add mustard seeds. When it crackles, add urad dal, bengal gram, and curry leaves and fry for few seconds.

· Then add the finely chopped onion, necessary salt, asafoetida, turmeric powder. When the onions become light brown, add the ground tomato-brinjal mixture. Add water depending upon the consistency. Let it boil for sometime, say for about 3-4 minutes.

· Then add the cooked toor dal and keep it in low flame for another 3 minutes. The original recipe did not call for toor dal but I used it and it added more taste to the sambar. To feed my kid packed with proteins, I preferred to add toor dal.

· Finally, garnish with some coriander leaves and serve hot with idli and dosa. I bet even the brinjal allergic persons will also love this sambar.

This goes to Mahimaas 15-minute cooking and EC’s side dish event.

Friday, April 3, 2009

CAULIFLOWER PEAS SUBJI/GRAVY


Hip Hip Hurray!!! I have lost around 10 kgs (25 pounds approx) now and you know am feeling great…I was really depressed by the extra weight I have put on during pregnancy and delivery. When my favourite dresses could not fit in, I was so mood off every time but the determination in me has won now….Am gifted by DH three wonderful dresses and of course for blogging purpose, MW and Kitchen Sets.....(hehehe, blogging is dominating more at home nowadays). Earlier I was not much interested in MW but after entering into the blogging world, I am seeing so many fabulous recipies to try but pity me could not try since I don't have the oven..This is the one that came to my mind when DH asked something I really want..I am yet to start baking and I have tried few simple recipies which have come out pretty well so far ..

Thanks to blogging I got to know so many kinds of rotis and parathas and a variety of subjis now. This cauliflower peas combi was one among them and it was a wonderful dish indeed.

INGREDIENTS:

Cauliflower – 1 big or medium size separated into florets

Peas – 1 cup

Onion – 1 to 2 medium size

Tomato – 2 medium size

Ginger – 1 inch piece

Garlic – 4 to 5 flakes

Turmeric powder – 1/2 tsp

Chilly powder – 2 tsp

Cumin powder – 1 tsp

Coriander powder – 2 tsp

Garam masala – 1/2 tsp

Cumin seeds – 1 tsp

Oil and salt – as required

METHOD:

· Wash the cauliflower florets in warm water with a pinch of salt.

· Grind onion, tomato, garlic, ginger to a coarse paste. I feel the coarse paste will give a bright look rather than a smooth paste.

· Heat pan/kadai with some oil, add cumin seeds and when it becomes brown, add the ground masala carefully.

· Add necessary salt, turmeric powder, chilly powder, garam masala, coriander and cumin seed powder to that and stir for sometime until all the powders get mixed with the masala.


· Then add the cauliflower florets and peas and mix well. Add some water, say for about 3/4 to 1 cup of water, depending upon the consistency.

· Close the pan/kadai with a lid and let it get cooked with the masala for sometime. Keep stirring in between.

· When the florets and peas have become tender and cooked well, transfer the contents to a bowl and serve hot with rotis or parathas.

Saturday, March 28, 2009

MASALA PAAL/MASALA MILK

As everyone of us know that Mahima speaks more by her photographs than by her words. After seeing her Masala Milk, I was so tempted to try that. She was remembered about this by Priya of priyaeasyntastyrecipes. Thanks both for posting a wonderful and delicious recipe. I tried at home shortly. It was a hit at home and nowadays this has become a must at home on weekends. Of important note is that my little demon also liked this very much and is drinking the whole cup of milk without giving a pause for breath!!!!!!

INGREDIENTS:

Milk - 3 cups

Sugar – 3 spoons

Condensed milk – 1 tsp

Cinnamon – 1

Cloves – 3

Cardamom – 2

Turmeric powder – a pinch

Badam and Cashews (sliced in strands using the grater) –5 each

Pepper powder – 1/4 tsp (optional)

METHOD:

· Heat milk in a heavy bottomed vessel. Once it starts boiling, add cinnamon, cloves, cardamom, sugar, and a pinch of turmeric powder to the milk and heat it for a while in low flame. Add condensed milk in between and keep stirring for sometime. Adding condensed milk will give a unique taste to the masala milk.

· Discard the spices by filtering and add the almonds and cashews strands. As I had sore throat, I added pepper powder at the end. It was also good.
· Serve hot. This is usually taken after dinner which will give a good sleep.

Sunday, March 22, 2009

MOM'S TOMATO THOKKU

Hi buddies, thanks for all your good wishes. I felt very cheered up to see your heartfelt love through your comments. I have come out of the blues and doing pretty good now though I get tired very soon then and there while doing the routine chores. Hope I will be back to normal soon!!!

After seeing Sanghi’s fall in love with tomato event announcement, my brain had forced me to travel back in time and reveal those cherished moments once again, albeit with a sigh!!

During my childhood days, I was not a liker of tomatoes and I hate that yucky tangy taste tomatoes. Whenever, I get tomatoes accidentally served in sambar/rasam, I avoid the whole part. I can remember even a petty fight with mom for preparing tomato rice for lunch. I donno exactly what made me to hate tomatoes to that extent…

During my class V, there was an Anglo Indian boy who joined my school due to his father’s job transfer. My school is a normal English medium standard school and not a very posh one like convent or matriculation type. The lessons were taught and explained in my native language, though the medium of education is English. The new boy does not know my native language and he insisted teachers to explain everything in English. His pronunciation was also of very high, obviously it would have been as he is an Anglo Indian product. Until his addition to my class, I had always been the topper and he took my place in every class tests and examinations then. He has become a pet to the teachers too because of this. Whatever effort I put in, I could not beat that guy in any examination. After school time is over, me and my brother used to wait for my father to get picked up. Till then, I will be doing my home works and my brother will be playing in the ground. That new guy will also be waiting for his mom to get picked up and he insists me to teach the native language. He taught me the basics in English and I taught him Tamil…He used to narrate stories too sometimes. He always ends up telling stories on tomatoes like tomatoes were going here and there, fighting with this, became juicy..some blah blah blah…..He must be craze on tomatoes, I think now.. Slowly, I too got interested in eating tomatoes after hearing repeated nonsense stories from that guy daily…Finally, I have landed here today saying that “I fell in love with tomatoes there.”

I am craze of tomatoes now and without tomatoes, I can hardly manage the kitchen/menu once and I will go mad after that. Whenever I want something refreshing, I always take tomato juice served chill. See, how taste changes in life!!!!

Coming to the recipe, this tomato thokku is again my mom’s signature dish. I learnt this from my mother. Whenever I got to go there or she comes to see me, she will always prepare and bring this thokku for me. My little demon also likes this. I can easily feed him the idlys and dosas in no time if this is the side dish.

INGREDIENTS:

Tomatoes – 1 kg

Mustard seeds – 1 tsp

Hing – a small piece

Tumeric powder – 1 tsp

Red Chilly powder – 5-6 tsp (depending upon the spiciness level)

Asafoetida – a small piece

Fenugreek– 1 tsp

Oil – As required

Red color kesar powder – a pinch (optinal)

METHOD:

· Heat kadai and dry fry fenugreek until it turns brown and grind this to a fine powder. Keep it aside. You will get more flavor out of it when dry frying them.

· Cut tomatoes into small pieces and make it juicy with the help of processor/juicer.

· Heat kadai/pan with oil (liberally), add mustard seeds and asafoetida and when it splutters, add the turmeric powder and tomato juice. Add necessary salt. Keep stirring then and there until the consistency becomes thick. It takes at least 45 minutes to an hour for the juice to dry up.

· Add red chilly powder, fenugreek powder, and red color kesar powder (optional) when the oil starts to separates from the thokku.

· Keep stirring now until the oil starts to float. Remove from fire and store in an airtight container. This will stay good for 15 to 20 days if refrigerated.

Am dedicating this to my mom as she taught me this authentic recipe and to my Class V friend (I donno where he is now, Haha) who made me to taste tomatoes.

Friday, March 13, 2009

BREAK

After all the previous week's disasters, I finally fell down in bed with temperature spike over 101 degrees starting from the week beginning and its still persisting..I am told to give a blood test for Typhoid. I managed to blog hop then and there, but I think I need badly a break now...I could not post anything nor do any reciprocations to all of you buddies..Sorry if I have missed commenting on any of your lovely recipes, please don't mistake me, i will surely catch up everything when I am back.

Till then, bye and take care dears..

Monday, March 9, 2009

TWO IN ONE RICE (CAPSICUM AND CLUSTER BEANS) WITH AN ARRAY OF AWARDS

It has been a week long I posted the earlier one. Last week fully, work was occupying me more and could not have time even to sit relax for a second. With increased office work, servant maid got abscond without any prior information, toddler’s caretaker took leave for two days, each day was more hectic than the previous day. Weekend also went somehow fast as there was a function to attend.. Got up early, disturbed toddler’s sleep and hurried him to finish his morning routines, dressed him up, pestered hubby dear to get ready, finally when we reached there, there was a disappointment looking forward…Seems the function was postponed to another day considering that as more auspicious one and we have not been informed about this…..OMG!! Mind flashbacked a second quickly about the efforts taken…Sunday is the only day I can sleep relaxly for some extra time but that is also gone.. With so much of morning disappointment, the headache started and it persisted for the whole day… Am too tired now and exhausted and lethargic to start another week now.. With the hope that blogging will give me some energy by seeing all the colorful dishes and awards, deliberately sat now in midst of all the necessary chores.


Coming to the recipe, both capsicum rice and cluster beans rice are made using vangi bhat powder and is a perfect lunch box item. During the initial days of marriage, my hubby was not in much interest with capsicums and cluster beans but right from the first time I prepared both of these, he started liking both these veggies.. So, if you are not a much-liker-of capsicum/cluster beans, try this once and definitely you will start liking this


INGREDIENTS:

Cooked Basmati rice – 2 cups

Capsicum/Cluster Beans – 250 g

Onion - 1 medium size

Green peas – 1 cup (optional)

Clove/cinnamom – each one

Bay leaf – 1

Green chilly – 1

Salt – to taste

Oil – 2 tsp

Ghee – 1 tsp

TO MAKE POWDER:

Asafoetida – a small piece

Red chilies – 8-10 (adjust according to your spiciness level)

Bengal gram – 4 tsp

Urad dal – 2 tsp

Coriander seeds/dhaniya – 3 tsp

SEASONING ITEMS:

Mustard seeds – 1 tsp

Urad dal – 1 tsp

Curry leaves – few


METHOD:

· Wash and drain the basmati rice and keep aside for 10 minutes.


· Heat pan with ghee, add the spices and bay leaf, then add turmeric powder, onion and sauté well until the onion becomes light brown. Then add the rice and salt and double the amount of water to the rice. Pressure cook for two whistles.

· Heat kadai with little oil, fry the ingredients given in the list “to make powder” one by one, and grind to a fine powder.

· In the same kadai, after removing the ingredients, add some more oil if required, add the seasoning items one by one, then curry leaves, then the capsicum/cluster beans and peas. Add little salt and turmeric powder and mix well. Close with a lid and let it get cooked in medium flame for sometime. Stir in between else the veggies will be overburnt. Once the veggies have become tender and cooked well, add the ground powder, mix well. Keep it in low flame for 2 minutes stirring in between.

· Add this to the cooked and cooled rice and mix gently with a ladle. Check for salt and adjust accordingly. If you wish, you can also add a teaspoon of ghee for a good aromatic flavor.

· Serve hot with any pappad or side dish of your choice.
AWARDS SECTION:

Sanghi and Shama has honored with not just one award but an array of awards!! I feel very happy and energetic dears.


I would like to pass this all my blogger friends as am sure these awards will make one feel very brisky and energtic..

Sunday, March 1, 2009

KADHAMBA KUZHAMBU/KOVIL KUZHAMBU WITH A TOUCH TO MY ANCESTRAL ORIGIN

The name itself suggests that it’s a mixed vegetable kuzhambu prepared in temples for prasadham. This is a no onion recipe as prepared mostly for divine purpose. Whenever I think of this Kadhamba Kuzhambu, my mind suddenly traces back to my ancestral origin, Srirangam.

Though I have been there only for short periods during festivals and vacations, it has always occupied a special place in my heart.


Being an ancient temple town, Srirangam is formed as a square. With the Ranganathar temple as the central feature, there are 12 streets marking 12 months of tamil calender around the temple which you cannot find anywhere in India. Festivals and utsavams are regular phenomenon here.

Most houses on these streets are quite old and have a distinct architectural style. The houses are long, really long. The breadth differs, from just five feet across to fifty feet across. A huge verandah or a Thinnai in the front is a common feature. The roads are broad and the houses have open spaces jutting the road. This is usually reserved for decorating with massive but intricate kolams.

I love evenings in Srirangam. Mami’s (Aunty’s) of Srirangam finishes all their house chores and sit in the verandah and used to talk blah-blahs…We can also see groups of people doing Veedhi pradakshinam (procession) reciting slokas and mantras. Srirangam often reminds me of RK Narayan’s Malgudi Days.

Vaikunda Ekadasi is observed here with great fervor and fantasy. Lacks of devotees line up to worship Lord Ranganathar during that time. this festival is celebrated for 20 days as 10 days Pagal patthu (before Ekadasi) and 10 days Rapatthu (after Ekadasi). During that time, temple provides food for the people who comes from other places, however, Srirangam people too will have that food as they consider having that food as divine.

On one such occasion, I visited my granny’s place during Ekadesi festival, we joined my granny to have the divine food. There, I was served this Kadamba sadham (rice). It was really divine, I should say. Such a great food I have never tasted in my life after that. There my love started on this kuzhambu. After that I have insisted my mom many times to prepare this. Whenever she prepares, I definitely do not know how much quantity I intake.

After I have got married, luckily my hubby also got attracted to this kuzhambu and he insists me to prepare this nowadays. I will be preparing this mostly during vritha/festive/amavasai (fasting) days.

Letz go for the recipe now..

INGREDIENTS:

Pumpkin – 100 g (Cut into cubes)

Beans – 50 g (cut in 1 inch long)

Carrot – 50 g (cut in 1 inch long)

Cluster Beans – 50 g (cut in 1 inch long)

Potato – 100 g (peeled and cut into cubes)

Peas (optional) – 1/2 cup

Avarakkai (Valor/Broad Beans) – 50 g

Tomato – 1 medium size (optional)

Tamarind – 1 lemon size (cut into medium 1 inch strips along the width)

Mustard seeds – 1 tsp

Curry leaves – few

Green chilly – 1 or 2

Tumeric powder – 1 tsp

Salt – To taste

TO GRIND

Asafoetida – a small piece

Red chilies – 10 (Adjust according to your taste)

Bengal Gram – 3 tsp

Urad dal – 2 tsp

Toor dal – 2 tsp

Coriander seeds/Dhaniya – 3 tsp

Peppercorn – 1/4 tsp

Fenugreek – 1 tsp

METHOD:

· Heat kadai with little oil and fry the ingredients given in the list “To grind” one by one carefully. Grind this to a fine powder.


· Heat the same kadai with some oil, add mustard seeds and when it splutters, add the curry leaves and green chilly.

· Then add the veggies, salt, and turmeric powder. Mix well and close the kadai with a lid.

· When the veggies are half cooked, add the tamarind extract and let it boil.

· When the veggies have become tender, add the ground powder. Make sure no lumps are formed while adding this to the kuzhambu.

· Mix well and keep it in low flame and let it boil for sometime, say for about 5 minutes.

· Once the kuzhambu has become thicken, remove and serve with hot steamed rice. You can also mix this with cooked rice adding little ghee. A teaspoon of gingely oil while mixing will add a yummy taste to it.

I even add Ulunda Vadais to this kuzhambu whenever I prepare this kuzhambu and Vadai together.

AWARDS:

Anusriram of Chandrabhaga , Malar of Kitchen Tantra - tease your palate have passed “Circle of Friends” Award. Thatz so wonderful to think that I’m in their circle even though 1’m new to blogging world. Thanks dears and I will be in your circle always.

Shama Nagarajan of EASY2COOK RECIPES has passed me the “Blogging with Purpose” Award. So cute that she thought about me and have passed this. You can find the purpose of my blog in my “About Me” buddies…

I would like to pass both these awards to
Viki Xavier, Yasmeen, Sanghi, Adlak’s, Vidhas, Mahimaa, n33ma,, Deesha, Madhu ,., Raji, Madhumathi, sowmya, jeyashrisuresh, and Jaishree.
I would like to contribute this award to my kid, Harivatsan, as when he grew up he will definitely be happy that his mom’s recipes and writings will be with him ever…Of course, thatz the purpose of my blogging..

Wednesday, February 25, 2009

CAULIFLOWER PULAO AND AN AWARD


Sometime back, my hubby got two big size fresh cauliflowers and when I asked him what can I do with two big size ones for a small size family of us, he replied “prepare pulao.” There my mind got struck because I have used cauliflower in veg pulao but never used cauliflower as the main ingredient. I usually add cauliflower at the last while making veg pulao [before closing the lid of the pressure cooker] as it tends to get overcooked even for 2 whistles. My hubby always insists that cauliflower should be cooked in the right way and should not be overcooked. Then I thought of googling for the recipe but I totally forgot about that in busy work schedule.

When I opened the refrigerator after office hours, I remembered about the recipe after seeing the flowers sitting on the shelf. Thought to browse for the recipe but my kid never left me to sit in the system even for a second. Nowadays, his naughtiness has become intolerable. I have to run behind him and really scared to leave him even for a second….I really wonder how mom tackled two of us (me and my brother) and managed everything pretty nicely…

Coming to the recipe, I thought of going ahead like my normal pulao method. Then had the doubt how masalas will blend to the cauliflower if I add it finally. Then I thought to cook rice separately and make the masala separately and mix it.

While preparing, I just went ahead whatever came to my mind. I cooked the rice along with spices and prepared the masala separately. The final outcome was flawless. There was perfect blending of spices with mild aromatic flavor and cauliflower with almost at roasted edge. Believe me, I can even smell the flavor of cauliflower in rice also. Am sure, definitely you will enjoy this.

Lets go for the recipe..

INGREDIENTS:

Basmati rice – 2 cups

Cinnamom – 1

Clove – 2

Bayleaf – 1

Mint leaves – few

Onion – 1 medium size

Cauliflower – 1 big or medium size (separated into florets and cleaned in warm water)

Potato – 2 medium size (washed, peeled, and cut in cube size)

Peas – 1/2 cup

Green chilies – 2

Yogurt– 1 small cup

Tumeric powder – 1 tsp

MTR pulao masala – 1 tsp

Garam masala – 2 tsp

Chilly powder – 3 tsp

Cumin seeds – 1 tsp

Ginger garlic paste – 1 tsp

Ghee and oil – as required

Salt – to taste


METHOD:

· Wash and drain the basmati rice and keep aside for 10 minutes.

· Heat pan with little ghee/oil, add the spices and bay leaf, then add turmeric powder, green chillies, mint leaves, onion and sauté well until the onion becomes light brown. Then add the rice and salt and double the amount of water to the rice. Add yogurt finally and pressure cook for two whistles.

· Meanwhile, heat kadai with oil, add cumin seeds, then add ginger garlic paste. Fry until the raw smell goes off. Add the cauliflower, potato, and peas one by one, add turmeric powder and little salt. (Be careful here as we have already put salt in the rice also). Let it get cooked on low to medium heat. Otherwise it will be burnt.

· Once the potatoes and florets have cooked and add garam masala, pulao masala, chilly powder, and mix well.

· Now add this to the cooked rice and mix gently.

· Garnish with coriander leaves and serve hot with any raita or chips.


Hema of Adlaks Kitchen and Vidhas of Appetizing recipes have passed me the super duper chef award. Thanks so much buddies for thinking of me. Its nice to fill up the left side bar with awards. So sweet of you dears…

I would like to pass this to all my blogger friends as I really think each and everyone has their own style in making wonderful dishes and really all of them are super duper chefs managing their kitchen in a wonderful and healthy way.
Some of blogger friends comments got erased accidently while doing moderation, I really feel sorry about that and dont mistake me if you could not see your comment here..[ALL THAT LITTLE DEMON'S WORK]..Am really sorry buddies..

Monday, February 23, 2009

WE ARE PROUD INDIANS - AR RAHMAN BRINGS TWO OSCARS

My day started with excitement about the Oscar and my hubby kept on watching the news to know whatz keep going.

When the news flashed, I jumped with excitement and happiness that Rahmanji won the award. I even shouted in excitement like a small girl that “We are proud Indians today.”

Soon the joy multipled when the second flash news hit on the screen that he has won another award also…Oh, am wordless…Speechless..

"All my life I had the choice between hate and love. I choose love and here I am" - are the Golden Words uttered by A.R.Rahman when he recd the prestigious Oscar Award. It kept on ringing my ears… Love can do miracles and he proved that..

Oh, what a humbleness Rahmanji is having. We wish ARR all the best for more such opportunities for making India proud!

Recently, Abhinav Bindra won the gold medal in Olympics..Now we have hit the Oscar too…India is going places and we are proud Indians…

Sunday, February 22, 2009

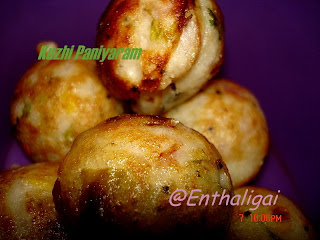
KUZHI PANIYARAM


Kuzhi Paniyaram takes a special place in Chettinad cuisine. Kuzhi paniyaram can be made either sweet or savory. As I have a savory tooth more than of sweet, I often prepare this kara kuzhi paniyaram at home. Kara kuzhi paniyaram can be made easily with the leftover idli batter by adding little ingredients.

INGREDIENTS:

Idli batter – 2 cups
Onions (finely chopped) -1 cupGrated ginger- 1 tspGreen chilli (finely chopped) –6-7 Curry leaves-a few
Coriander leaves-handfulOil – As required.
Salt – As required

SEASONING ITEMS:

Mustard seeds – 1 tsp
Urad dal – 1 tsp

METHOD:

· Heat oil in kadai, add the seasoning items, when they are ready, add the curry leaves, ginger, green chilies, and onion one by one, add little salt. When the onions have become light brown, add this to the idli batter. Add the chopped coriander leaves to this and mix well.

· Heat the paniyaram pan and add 1 teaspoon of oil in all the impressions. Pour the batter in them. After few minutes, turn the paniyaram so that it gets cooked on the other side.

· Serve hot with onion-tomato chutney or sambar or any side dish of your choice.

Tuesday, February 17, 2009

PUMPKIN – CHICKPEA PORICHA KUZHAMBU


This poricha kuzhambu is a famous dish in Tamilnadu & especially among Tamil Brahmin’s. This is my mom’s signature dish and whenever I visit my mom’s place, this has always been the one among my list that I ask for her to prepare.

We can also substitute mochai in place of chickpea. The common veggies used for poricha kuzhambu are pumpkin, brinjal, bitterguard, and drumstick. I have also added greens stem (keerai thandu) to make it in more healthier.


INGREDIENTS:

Pumpkin – 250 g

Chickpea/White channa – 1 cup

Greens stem – 1 cup (cut in 1 inch long strips)

Tomato – 1 medium size

Tamarind – 1 lemon size (juice to be extracted)

Mustard seeds – 1 tsp

Curry leaves – few

Turmeric powder – 1/2 tsp

Salt – To taste

TO GRIND:

Asafoetida – a small piece

Peppercorns – 1/2 tsp

Red chilies – 8 (adjust according to your spiciness level)

Fenugreek – 1/4 tsp

Urad dal – 4 tsp

Grated coconut – 3 tsp (add more if you are a coconut lover)

Sambar powder – 1 tsp

METHOD:

· Wash and soak chickpea overnight and pressure cook for 3 whistles.

· Extract the juice from tamarind and keep aside.

· Fry the ingredients given in the list “To grind” in little oil, lastly add the coconut while frying, remove from heat, and allow it to cool. Add sambar powder to this and grind to a smooth paste.

· Heat oil in kadai, add mustards and once they start to splutter, add curry leaves.

· Then add the pumpkin, tomato, and greens stem one by one. Add turmeric powder and salt and mix well. Let them get cooked in oil for sometime, say for about 3 minutes.

· Now, add the tamarind extract. Mix well and allow it to boil.

· When the veggies are half cooked, add the chickpea.

· Once the veggies are fully cooked, add the ground paste, mix well. Make sure no lumps are formed while adding the ground paste.

· Allow it to boil until the oil separates from the kuzhambu. Serve with hot steamed rice. I love to have this with dal rice (paruppu sadham).

This is on the way to FIC - Orange hosted by Aparna of My Diverse Kitchen started by Harini.

Saturday, February 14, 2009

POONDU MILAGU KUZHAMBU (PEPPER GARLIC GRAVY)


Today in fast food world, we sometimes tend to forget these kinds of authentic recipes which has lot of medical values. This pepper and garlic gravy helps in relieving abdominal bloating, nausea, vomiting, anemia, indigestion, and prepared as a special diet for lactating moms. This is an easy dish which can be prepared in just 10 to 15 minutes. So, when you get bored of sambar or masala items, try this once and I am sure definitely you will fall in love with this.

INGREDIENTS:

Peppercorns – 2 tsp

Bengal Gram – 2 tsp

Urad dal – 2 tsp

Coriander seeds – 2 tsp

Red chilies – 6

Cumin seeds – 1 tsp

Fenugreek – 1 tsp

Garlic flakes – 10 to 15

Oil – 1/2 tsp

Tamarind – 1 amla size

Asafoetida – a small piece

SEASONING ITEMS:

Ghee – 1 tsp

Mustard seeds – 1 tsp

Cumin seeds – 1/2 tsp

Curry leaves - few

METHOD:

· Soak tamarind in one cup of water.

· Heat pan with little oil and fry all the above said items except tamarind and garlic flakes. Fine grind the mixture with soaked tamarind. Use the water in which the tamarind is soaked while grinding. Keep aside.

· In the same pan, add a tsp of ghee, add mustard seeds, cumin seeds, and curry leaves one by one. Once seasoning is ready, add the garlic pods. When it becomes light brown, add the ground paste and the remaining water used to soak the tamarind. Add salt and mix well. Make sure no lumps are formed while adding the ground paste.

Allow it to boil and stir constantly until the oil separates from the kuzhambu. Serve with hot steamed rice. If refrigerated, this kuzhambu can be kept for a week to 10 days.

Tuesday, February 10, 2009

CHETTINAD KARA KUZHAMBU


Chettinad cuisine is widely popular and known for its spiciest, oiliest, and aromatic flavor in any dishes. The dishes are hot and strong with fresh ground masalas which gives a distinctive taste to the dishes.

My hubby dear hails from Chettinad region and through him I have learnt lot of recipes. When I mentioned to my hubby about an event running for Chettinad cuisines, he taught me this authentic recipe which he is very much fond of. It was a different and funny experience when he stood nearby and explained each and everything (as if I don’t know even the basics). However, the dish came out awesome and full of flavor.


The sad thing is I could not send this for the event as I have posted it too late.. I was totally occupied with the work and could not post this on time…Anyway, those funny moments have become one of my fondest memories now..

INGREDIENTS:

Pumpkin – 250 g

Mochai (either dry or fresh) – 1 cup (I used fresh ones paccha mochai and if your are using dry mochai, soak overnight and pressure cook)

Onion – 1 medium size

Chilly powder – 1 tsp

Tamarind – 1 lemon size

Garlic flakes – 10

Mustard seeds – 1 tsp

Asafoetida – a pinch

Curry Leaves – few

Oil – 2 tsp

TO GRIND:

Onion – 1 medium size

Tomato – 1 medium size

Coconut – 2 tsp

Sambar powder – 3 tsp

METHOD:

· Heat pan with little oil, add half of the onions and once they have become translucent, remove and allow it to cool. Grind this along with tomatoes, sambar powder, and coconut.

· In the same pan, pour some more oil (if needed), add the seasoning items and when they are ready, add curry leaves, garlic flakes, and the remaining onions. When the onions have become light brown, add pumpkin, mochai, and necessary salt. Then add the chilly powder and mix well.

· Now add the tamarind extract and mix well and allow it to boil.

· When the pumpkin and mochai is half cooked, add the ground masala paste and mix well. Let it cook in medium flame for 10 to 15 minutes or till the pumpkin and mochai is fully cooked and kuzhambu becomes thicker.

· Enjoy this with hot steamed rice.

Needless to say, this goes to FIC - Orange hosted by Aparna of My Diverse Kitchen started by Harini.

Friday, February 6, 2009

CURRY LEAVES RICE (KARUVAPILLAI SADHAM) AND AWARDS

Every weekend, there is a strict adherence followed at my home. I cook pathiya samaiyal (saatvik khana) either on Saturday or Sunday to give bowel a rest after tackling the whole week’s heaviness. Even though I concentrate more on healthy dishes during weekdays, I could not resist hubby dear eating burgers and bondas for evening snacks (his office caterer is Chennai’s famous Saravana Bhavan and Ananda Bhavan, thatz a different thing). Hence, I make it a point to prepare pathiya samaiyal during weekends in concern over hubby dear’s healthiness and give taste buds a change from the regular masala items.

Last weekend, I was very much occupied with house chores, official work (I took the option of work from home after delivery), and kid’s naughtiness, I could not spend much time for cooking but I don’t want to give up my routine. My mind quickly struck at this recipe and I tried it without any second thought. Believe me, this came out wonderful. I got the whole credits from hubby dear!!

Without boring you, let me go for the recipe now.


INGREDIENTS:

Cooked Rice - 2 cups

Fresh curry leaves – 2 cups

Mustard seeds – 1 tsp

Urad dal – 5 tsp

Red chilies – 10 (Adjust according to your spiciness level)

Tamarind pulp – 1 amla size

Asafoetida – a small piece

Salt – to taste

Ghee/oil – As required

METHOD:

· Cook rice in pressure cooker, spread in a plate and allow it to cool.

· Heat pan with little oil, throw mustard seeds and when it splutters, add asafoetida and urad dal. When urad dal becomes light brown in color add red chilies and fry for some seconds.

· Now grind this along with the curry leaves, salt, and tumeric pulp coarsely.

· Add this mixture to the cooked rice and mix well. Add ghee if required. Tastes best when little ghee (1 tsp) is added.

· Serve hot with any side dish of your choice. Pappads suits best with this.

Oh my friends, I have not yet finished.

Viki and Malar have honored me with Good Chat Blog award. It’s a nice feeling when someone remembers us only with our writings and recipes. Thanks a ton to both for remembering me and passing the award.

I would like to pass this award to Adlak’s, Mahimaa, and Jeyashri Suresh. I think most of you people will be knowing that Adlak’s is my Manni (cousin brother’s wife) and she only intro’d me to this wonderful blogging world. Now, blogging has made a huge difference in me. I should be thankful to her ever and as a matter of reciprocation I would like to honor her with this Good Chat Blog award.

Mahimaa, needless to say, is a wonderful person who helps me in clearing even small doubts I have even in her busy schedules…Thanks Mahi and hope we will continue our chatting ever!!!

Jeyashri Suresh. I strongly felt that this award should be passed to JS. Even though she has not yet started posting her recipes, she takes time to comment each and everyone recipes by her motivating comments and nice tips.. JS, keep up your good work and hope I will see you starting your own recipes soon…..

Monday, February 2, 2009

ALOO MUTTER


This is a simple but excellent side dish that can be made with just only a few ingredients in the pantry.

INGREDIENTS:

Potatoes – 250 g ( I used baby potatoes)

Green Peas – 1 cup

Onion – 3 medium size

Tomato – 2 medium size

Ginger-garlic paste

Chilly powder – 3 tsp

Coriander powder – 2 tsp

Garam masala – 1 tsp

Clove, cardamom, cinnamon – 1 or 2 each

Oil – 2-3 tsp

Salt to taste

METHOD:

· Pressure cook potatoes for 2 whistles.

· Chop onions and grind to a fine paste. Blanch tomatoes and make a puree.

· Heat pan with oil, add the seasoning items followed by ginger garlic paste. Fry well till it is brown. Then add the green peas and onion paste and mix well.

· Then add the tomato puree. Add chilli powder, garam masala, coriander powder, salt. Add water if necessary.

· Once the raw smell goes off partially, add the cooked potatoes and mix well.

· Let it cook for sometime (say about 10 minutes) till the gravy get thickens and the raw smell goes off completely.

· Now, yummy aloo mutter is ready. Serve hot with rotis/pooris.

Thursday, January 29, 2009

CHANNA PULAV

Channa has good source of protein and dietary fibre and pulav with channa made it very rich and healthy. Hope everybody will like this...


INGREDIENTS:

Basmati Rice - 2 cups

White Kabuli Channa - 1/2 cup

Tomatoes - 3 big suze

Onion – 2 medium size

Green chilies - 2

Garlic - 4 flakes

Oil – As required

Coriander leaves - 1/2 bunch

Cinnamon - 1 inch piece

Cardamoms - 1

Cloves - 2

Bay leaf - 1

Garam Masala - 1/2 teaspoon

Ghee – 2-3 tsp

TO GRIND:

Onions – 2 medium size

Red chillies – 8 (adjust according to your spiciness level)

Cumin Seeds -1 teaspoon

Garlic – 8 flakes

Grated fresh coconut - 3 tablespoons

METHOD:

· Heat pan with little oil and fry red chillies, cumin seeds, garlic, and onions.

· Cool and grind along with coconut and tomato.

· Soak Channa overnight and pressure cook with little salt for 4 whistles.

· Soak rice in warm water for 10 minutes and drain water completely.

· Heat pain with some oil, add the spices, then garlic and fry till brown.

· Add slit green chilies and onion. Fry for a minute and then add ground masala.

· Add garam masala and salt and mix well.

· Then, add cooked channa, rice, and double the amount of water/coconut milk and pressure cook for 2 whistles.

· Once pressure is released, add ghee, mix well, and garnish with coriander leaves. Serve hot with any side dish of your choice.

Monday, January 26, 2009

SPICY MASAL VADA

One of the famous South Indian specialty snacks. Takes less time to prepare and is a perfect tea time snack.

INGREDIENTS:

Bengal gram - 1cup

Toor dal – 1/2 cup

Urad dal – 1/4 cup

Green chilies – 5 (adjust according to your spiciness level)

Asafoetida powder – a pinch

Salt to taste

Onion – 1 big size (finely chopped)

Coriander leaves/ curry leaves - few (finely chopped)

Shredded ginger – little

Oil to fry

METHOD:

· Wash and soak the dals for one hour approximately.

· Keep about 2-3 tsp of dals dhal separately in the bowl and grind the remaining dals coarsely with salt and a pinch of asafoetida without adding water.

· To this ground mixture, add chopped green chilies, onion, curry leaves, coriander leaves, shredded ginger, and the dals (2-3 tsp) which is kept separately before grinding.

· Heat oil in a pan and make balls off the dough and flatten them into the shape of vadas and fry till golden brown.

Friday, January 23, 2009

OATS PONGAL

I have already talked enough about Oats.. I tried pongal using Oats…The best thing is my hubby could not find out its done using Oats!! It turned out in such a good way…Herez the recipie..

INGREDIENTS:

Oats – 1 cup

Moong dal – 1/4 cup

Cumin seeds – 1 tsp

Peppercorns – 1 tsp

Asafoetida – small piece

Ginger – little

Cashews – 5 (optional)

Ghee – little

METHOD:

· Pressure cook oats and moong dal adding salt in enough water for four to five whistles. It can be in the ratio of 1:3.

· Meanwhile, grind asafoetida, peppercorns, cumin seeds, and ginger.

· Once pressure is released, heat the pan with little ghee, add the ground items and fry for some seconds. Then, add this seasoning to the Oats-Dal mixture. Mix well until the seasoning and Oats-Dal mixture combine together thoroughly.

· If needed, fry cashews in little ghee to golden brown and add to the mixture.

· The final consistency will be like a pudding. Serve hot with any side dish of your choice.

This is on the way to FIC-YELLOW at http://tumyumtreats.blogspot.com/2009/01/announcing-food-in-colors-january-2009.html hosted by sunshinemom of tongue ticklers.

Tuesday, January 20, 2009

MY FIRST AWARD –YOU PEOPLE HAVE MADE MY DAY!!!

Mahimaa and Viki Xavier have passed me the lemonade award. I am speechless and wordless now. Being a new blogger, I feel very enthusiastic and motivated. I am able to see the young girl in me jumping with happiness. Thanks much for remembering me and passing the award dears…

I would like to pass this award to Jaishree, AnuSriram, and Malar Gandhi..

Monday, January 19, 2009

GREEN MOONG DAL DOSA (PESARATTU)

Green moong dal is packed with protein in its raw form, an essential part of a vegetarian diet. A pesarattu is a delicious type of dosa made specifically from green moong dal, however, I adjusted the ingredients according to my taste. Pesarattus can be eaten at anytime of the day; as breakfast, brunch or even for dinner. This wonderful and tasty recipe is easy to prepare and very nutritious. Of note, one medium size dosa contains approximately 130-150 kilocalories.

INGREDIENTS:

Green Moong Dal (Whole) – 1 cup

Parboiled rice – 1-1/2 cup

Raw rice – 1/2 cup

Bengal gram – 2 tsp

Toor dal – 2 tsp

Red chilies – 8-10 (adjust according to your spiciness level)

Asafoetida – a pinch

Salt – As needed

Onion – 1 medium size

Finely chopped coriander and curry leaves – few

Oil – As required

METHOD:

· Wash and soak the dals and rice separately for three hours.

· Grind it to a smooth paste along with red chilies, salt, and asafoetida. Transfer to a large mixing bowl and add the finely chopped onions and coriander and curry leaves. Mix well to combine and set aside as needed. The batter should have a pouring consistency similar to that of dosa.

· Heat the dosa pan, pour the batter and spread it from the center. Pour a tsp of oil over the edges.

· When one side is cooked well, flip over to the other side. If necessary, add little oil over the edges, and remove when it is fully cooked.

· Serve hot with any side dish of your choice.

Am going to send this to the FIC-Yellow at http://tumyumtreats.blogspot.com/2009/01/announcing-food-in-colors-january-2009.html hosted by sunshinemom of tongue ticklers.

As suggested by Adlak's and Anu, am also sending this to EC's Breakfast event http://simpleindianfood.blogspot.com/2008/12/mbpeasy-breezy-breakfast-event.html and Srivalli's Legume Affair Event http://cooking4allseasons.blogspot.com/2009/01/announcing-my-legume-love-affair.html. Thanks for reminding me Adlak's and Anu..

Friday, January 16, 2009

VEGETABLE MEDHU VADA


Medhu vada is a traditional south Indian dish that is prepared on every festive occasion. Although it is deep fried, if prepared correctly, the end product will not be too oily. Usually I make it only on festive occasions and at that time I could not do justice to my dietary restrictions and think about calorific counters…But the best part in me is I incorporate veggies in all possible ways as much as I can and I don’t mind to add veggies even in the deep fried ones.

INGREDIENTS:

Urad dhal – 2 cups

Salt – as per taste

Oil – as required

Carrot – 1

Carrot – 50 g

Onion – 1 (optional, I didn’t add as it was offered as neivedhyam to God on Pongal)

Boiled potato – 1 medium size

Ginger – 1 small piece

Green chilly – 5-7

Finely chopped curry leaves and coriander leaves – few


METHOD:

· Soak the urad dhal for 2 hours.

· Grind the urad dhal with very little water in the grinder, adding boiled potatoes and salt. Sprinkle water as and when needed. This is the most careful part in making perfect vadas. Adding boiled potatoes while grinding makes the vada crisper and fluffy. When the batter becomes a soft paste, remove and transfer to a bowl.
· Meanwhile, grate the carrot and ginger using the grater and chop the cabbage to thin medium slices. Chop the chilies very fine. We can also add green chilies while grinding urad dhal but that will give bland taste, instead adding the chilies to the batter gives spiciness enhancing the taste.

· Mix the veggies, curry leaves, green chilies to the vada batter thoroughly.

· Heat pan with oil. Meanwhile take a small amount of banana leaf or plastic sheet (ziplock), wet the leaf/sheet and hand, take a small amount of batter and spread in the leaf/sheet, gently press with the fingers to correct the shape, make a hole at the center. Take the vada in the hand removing the leaf and drop very carefully in the heated oil. Deep fry until it becomes golden brown.

· Serve hot with sambar/chutney.

Tips:
** If the batter has become watery, refrigerate for half an hour and make vadas.
** If you are not sure of the right time to remove, put a small amount of batter into water, it should float.
** Make sure the oil should be in medium heat. If the oil is too hot, it will burn the vadas.
Am sending this to srilekha's EFM - Savories Event .

Monday, January 12, 2009

INDIAN PANCAKE - CAPSICUM OOTHAPPAM

Oothappam is a traditional South Indian dish made from left over idli batter. Oothappams can be of any combination such as onion-tomato, onion-carrot, or onion-capsicum or simply onion. Also we should be aware that a medium size oothappam’s calorie ranges anywhere between 150-180.

INGREDIENTS:

Dosa batter – Required amount
Onion – Medium size 2 (finely chopped)
Capsicum – Big size 1 (finely chopped)
Coriander leaves – 1/2 bunch (finely chopped)
Mustard seeds – 1/2 tsp
Oil – Required amount

METHOD:

·
Heat pan with little oil, add mustard seeds, when they crackle, add the chopped onions and necessary salt. Adding salt to the onions will make the onions turn brown fast. When the onion turns slightly brown, add the capsicum.
· When the capsicum becomes tender, add the coriander leaves. Mix well. Transfer the contents in a bowl and keep it aside.
· Heat dosa pan and spread a teaspoon of oil over it.
· When it becomes hot enough, take a ladleful of batter and spread on it. Pour a teaspoon of oil over the edges. Note it should be thick than a normal dosa.
· Sprinkle onion-capsicum mixture on the dosa evenly. When one side is cooked well, turn over to the other side carefully and press it with ladle. If necessary, add little oil over the edges, and remove when it is fully cooked.
· Serve with any kind of chutney/sambar.

Saturday, January 10, 2009

MASALA PUFFED RICE/PORI


Masala pori is a perfect tea time snack. Having masala pori with a cup of coffee will be really delicious. This is a simple recipe that fills up and still makes us feel light even if we have overeaten. Usually, peanuts and puffed channa dal is added to the masala pori but I wanted to have a low-calorie version, hence didn’t added that, however, adding both peanuts and puffed channa dal will make it to taste more yummy. It can be prepared in large amounts and stored in an airtight container. Whenever we go for get-togethers or outing, I usually prepare this to avoid myself from eating fast-food items.

INGREDIENTS:

Puffed Rice – 1 litre

Crushed garlic flakes – 15

Curry leaves – few

Turmeric powder – 1/2 tsp

Chilly powder – 1/2 tsp (add more if you want it more spicy)

Powdered asafoetida – 1/2 tsp

Salt – to taste

Oil – 2 tsp

METHOD:

· Heat oil in a pan, add garlic flakes and curry leaves, once they have become brown, add turmeric powder, chilly powder, and asafoetida.
· Then add the puffed rice and salt, mix well and keep in flame for a minute or less than that if the volume is small, otherwise it will be overburnt.
· Switch of the stove. Crispy masala pori is now ready. Transfer the contents in an airtight container to maintain the crispiness.

Being a new blogger, I have not attended any events so far. This is the first event I am going to participate. Am going to send this to the FIC-- YELLOW at http://tumyumtreats.blogspot.com/2009/01/announcing-food-in-colors-january-2009.html hosted by sunshinemom of tongue ticklers.

Wednesday, January 7, 2009

OATS MORKALI


Oats, Oats, Oats!!!! This is the word we are hearing nowadays wherever we go…Whether it is a fitness consultant, medical consultant, dietitian, or nutritionist, the first thing everyone recommends is Oats. The craze has caught up because of its high medicinal properties. Eating Oats regularly lowers the blood cholesterol level. A diet which is rich in Oats helps stabilize blood glucose levels. It also has some unique fatty acids and antioxidants which together with vitamin E slow cell damage thus reducing the risk of cancer. It also absorbs the fat and flushes out of the system and helps constipation because of its high fiber content. Thus, it has become a responsibility of every mother and wife to be innovative in cooking up new dishes using Oats. I tried Morkali using Oats today which turned quite tasty. Hope it will be useful for many of you and will enjoy the dish.

INGREDIENTS:

Oats – 2 cups

Buttermilk – 2 cups

Green chilies – 4

Ginger – 1 small piece

Asafoetida – a pinch

Curry leaves – few

Salt – to taste

SEASONING ITEMS:

Mustard seeds – 1/4 tbp

Urad dal – 1/4 tbp

Bengal gram – 1/4 tbp

METHOD:

· Powder the oats finely using grinder.

· Make a smooth paste of ginger and green chilies separately.

· Mix the oats powder, ginger-green chilly paste, asafoetida, salt in buttermilk in a container.

· Heat oil in a pan, add seasoning items one by one. Once the seasoning is ready, add curry leaves, then add the oats powder-buttermilk batter, stir continuously and cook until it doesn’t stick to the sides of the pan. Care should be taken in stirring because it might form lumps otherwise.

· Serve hot with any sambar or chutney. I had with vattha kuzhambu and that too went well with this.

Monday, January 5, 2009

SAMBA RAVA KICHADI

Samba rava is nothing but broken wheat is a wholesome food which is good for diabetic persons. We can substitute the diet chart with dishes made of Samba Rava instead of Rotis during dinnertime. Having a one-year-old kid nagging behind me in the kitchen, I am not able to prepare roti and subji every day, hence, I prepare this samba rava kichadi which has also the same nutritious value.

INGREDIENTS:

Samba Rava (Broken Wheat Rava) – 1 cup
Vegetables – 1 cup (Beans, carrot, brinjal, potato, cabbage, green peas)
Onions – 1 medium size
Tomato – 1 medium size
Green chilies – 3
Shredded ginger – little
Curry leaves - few
Oil - 2 tbsp
Salt – To taste

SEASONING ITEMS:

Mustard seeds – 1/2 tsp
Bengal Gram – 1tsp
Urad dal – 1 tsp
Asafoetida – a pinch

METHOD:

· Wash and cut the veggies in small pieces.

· Heat the pressure pan with some little oil, add the seasoning items one by one. Once it is ready, add the curry leaves, shredded ginger, and green chilies. Then add the onions and tomato. When the onions become light brown, add the veggies and necessary salt.

· Then add the Samba rava and water in the proportion of 1:3. Mix well. Close the lid and pressure cook for 4 whistles.

· Once the pressure is released, garnish with coriander leaves and serve hot with any sambar or chutney. Even pickles go very well with this.