Sunday, December 18, 2016

VEGETABLE BIRYANI - WITH STEP BY STEP PICTURES

One of a long pending post from my draft.  Staying away from home on a business assignment and feeling bored and lonely on a breezy evening, hence thought to dive into this blogging to clear out some posts and to pen down some random thoughts.

Last two weeks I am out of country and many unfortunate things are happenings around my small world .  First one was the sudden demise of a great leader of my state, my Chief Minister.  I have never been politically inclined but have always been an admirer of her as an individual person for her boldness.   The society where I belong to does not much encourage woman to be a leader and to be on forefront on any position but she is one in million kind of a woman who picked up every stone thrown towards her and built an empire.  It is a loss to nation and it is a loss to women's society. 

Before I could digest her demise, we had another threat in the form of cyclone.  As a vivid follower of a famous TN weatherman blog, I advised, requested, and instructed my family not to move out of home.  As told by him, it had devastated the entire city.  When I saw the clippings on social media, I am almost at the verge of cry because the whole nature is spoilt.  During this period, I had gone through lot of mental stress as I could not reach out family members due to out of network.  There was no power at home and mobile network was not working anywhere.  It was one of a very difficult day in life.  It is a sad feeling to realize that when I return back to my city, I would not be seeing the same old Chennai and I would be missing many part of it. 

I have read many times somewhere on social media that in the blink of an eye everything changes, so please love the people who belong to you.  Yeah, that is true,  this is a take away truth from the above two happenings.


Moving on to the post, when I chit chat with my son the other day on Whatsapp, I asked him what he needs from here, he replied about his favorite toys and adding to that he replied as soon as I come back home, he requested me to prepare my specialty dish, Vegetable Biryani.   I am proud to say that every family member and friends of mine have always loved the version of my biryani.   The mild aroma of the spices blends to the mixed vegetables and the unique flavor from basmati rice gives a rich and addictive taste to the recipe.   


INGREDIENTS:
Mixed Vegetables (Beans, Carrot, Cauliflower, Potato) – 1 large bowl
Mint and coriander leaves – 1 cup
Onion – 1 big size
Tomato – 2 medium size
Soya chunks/Meal maker – half cup
Chilly powder – 1 teaspoon
Basmati Rice – 1 cup
Water – 1.5 cups
Oil - 4 tsp

To grind:
Ginger - 1/2 inch piece
Garlic pods - 5
Green chillies – 2

Tempering items:
Ghee – 2-3 tablespoons  or as desired
Bay leaf - 1
Cardamom – 1
Cinnamon – 1 inch
Cloves – 3-4
Oil – 4 teaspoons

Preparation:
1.  Wash and soak basmati rice for 10 minutes.
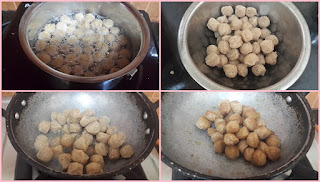
2.  Boil water in a vessel with little salt for 5 minutes and soak the soya chunks in it.  Squeeze the water from soya chunks and fry it in little oil.

3.  Wash and cut the vegetables of your choice and keep it ready.  Soak the cauliflower in boiled salt water.  The salt in the water would help kill the insects and it would leave from the flower.  Remove the cauliflower florets carefully later.  Wash the mint and coriander leaves and keep it separately.  The coriander leaves needs to be chopped roughly.
4. Grind the items given in "To grind" section to smooth paste.
5.  Heat oil/ghee in pressure cooker and add bay leaf, cinnamon stick, clove and cardamom.  Add onions , tomatoes, coriander leaves and saute for few minutes.  When the tomatoes turn mushy, add the mixed vegetables and required salt and mix well and allow to cook for 3-4 minutes.  Later, add the chilly powder and mix well.   Add 1.5 cups of water and let it come to boiling stage, add the fried soya chunks, cauliflower, and soaked basmati rice filtering the water. Cover and pressure cook for 1 whistle. Open the cooker , fluff the rice and serve.  
Delicious vegetable rice is ready to be served.

We had our yummlious biryani with onion raita.  

Monday, November 21, 2016

RIBBON PAKODA

Ribbon pakoda is one of spicy and crispy snack made from rice and bengal gram flour.  This popular snack is very easy to prepare and can be made in just half an hour.  I usually prepare this snack on weekends at times and store in large container and give this to Jr.H as school snack.  This is one of my signature dish and has never failed me on taste and crispiness.  Many of my colleagues had given me accolades after tasting this and would ask for recipe. 

The main secret of crispiness lies with dough; it had to be prepared in smaller quantities.  I mix all the ingredients and take a little portion and prepare the dough.  Also care must be given to prepare the dough at right proportion.  If the dough is dry the pakodas would be hard and if it is too moisten the stripes would not be continuous and would be breaking in bits.  The recipe that am going to share is a foolproof method and would never disappoint you.
Ingredients:
Rice flour - 2 cups
Bengal gram flour - 1 cup
Butter - 1 tsp
Red chilly powder - 1 to 1.5 tsp
Salt - to taste
Garlic paste - 1-2 tsp
Oil - for frying

Preparation:
1.  Sieve the rice and bengal gram flour separately to get rid of any tiny grains.  (I usually grind raw rice in bulk quantity in the rice flour mill as I am living in India but you can also use store brought rice flour for this).
2.  Grind the peeled garlic pods with 1/4 cup of water in a mixer and keep aside.
3.  Add in all the ingredients (rice flour, bengal gram flour, butter, chilly powder, salt) without water.  Filter the garlic mixture so that only the essence gets filtered in leaving out the pulp.  Mix well without any lumps.

4.  Take small quantity of mixture and knead well adding water.  
5.  Fill the nada pakoda press with prepared dough with ribbon pakoda disc into it. Once the dough is over, prepare the next batch of dough as above while the pakoda is frying in oil.

6. Heat oil and when the oil is hot, press the dough in hot oil in circular way to form a singular layer.  Don't layer too much, one layer gives out crispy and even cooking. When the bubble ceases, flip the pakoda and cook again until the sizzing of the oil ceases. 
7. Drain it in paper towel and store it in air tight container.

The pakodas become more crispier after it had cooled down completely.

Enjoy the pakoda as evening snack with a cup of tea - a perfect partner for each other on a breezy evening.

Sunday, November 6, 2016

BITTERGOURD PORIYAL

As we ate lot of sweets during Deepavali, DH put a rule at home to include bittergourd daily at home for a week.   Usually, I make poricha kuzhambu with bitter gourd that includes frying urad dhal, asafoetida, coriander seeds and grind along with coconut as addition of coconut subtle the bitter taste but this time I tried poriyal adding onion and tomatoes.  I must say the mild tangy taste from tomatoes reduced the bitter taste and added a special flavor to the poriyal.

INGREDIENTS:
Bitter gourd - 250g
Onion - 2-3 (sliced thin)
Tomatoes - 2 (sliced thin)
Garlic flakes - few 
Salt - to taste
Red Chilly Powder - 1 tsp
Turmeric Powder - 1 tsp
Oil - 3-4 tsp

To Temper:
Mustard seeds - 1 tsp
Urad dhal - 1 tsp
Green chillies - 2

PREPARATION:
1. Slice onions and tomatoes and cut the bittergourd in thin long 2" pieces.  Refer picture any doubts.

2. Heat oil in a heavy bottomed pan and throw in the tempering agents one by one. Put in onions and once the onions have browned well, add tomatoes and garlic flakes and little salt which is required only for onions and tomatoes.
3. Once the tomatoes have turned mushy , add the bitter gourd, turmeric powder, and salt required for bittergourd.  Mix well and cook it closing the pan with a lid.  Once the bittergourd had cooked well, add red chilly powder, keep in flame for few minutes and transfer to vessel.
4.  Serve as side dish for sambar/kara kuzhambu.  

We had as a side dish for drumstick-black channa puli kuzhambu with additional side dish of baby potato-cauliflower fry.

Sunday, October 16, 2016

Mor Kuzhambu - SPICY BUTTER MILK KUZHAMBU

Mor kuzhambu is a traditional dish among South Indians which is made with buttermilk and is made during festivals and special occasions. This kuzhambu can be made with many vegetables such as ladies finger, ash gourd, pumpkin, drumstick etc and can be made in several variations.  I am posting the recipe which I learnt from my mother.  This can be mixed with hot steamed rice with a teaspoon of ghee and it would taste wonderful.  
I prepared this last week and coincidentally one of our common friend visited us for lunch with her husband.  She liked it with very much. 

Ingredients:
Thick Butter milk - 2 cups
Ash gourd  - 1 cup
Soaked toor dhal and bengal gram - 2 tsps each
Coconut:  1 small cup
Green chilly - 8
Jeera - 1 tsp
Fenugreek seeds - 1/2 tsp
Dhaniya/coriander seeds - 1 tsp
Urad dhal - 1 tsp
Hing/Asafoetida - 1 small piece
Turmeric powder - 1 tsp
Salt - to taste
Oil - 1 tsp

To Temper
Mustard seeds - a tsp
Red chilly - 1
Curry leaves - few

Preparation:
1. Soak a teaspoon of toor dhal and bengal gram in water for half an hour.
2.  Boil ash gourd with little water adding turmeric powder and salt.
3.  In a pan, with little oil, roast asafoetida, fenugreek seeds, urad dhal, and coriander seeds.  While all had fried well, lastly add the green chilly and switch off the flame.  Grind this along with coconut, jeera, and soaked toor dhal.
4.  Take 2 cups of curd and beat it without any lumps adding little water and keep this butter milk aside.  When the ash gourd had cooked well, add the ground paste and mix well.  Let it boil for 2 minutes.  Then add the buttermilk and mix well.  Switch off the flame in a minute when you see start seeing froth on the top of the vessel.
5.  Temper the gravy with mustard seeds, curry leaves, and red chilly.
6.  Serve this kuzhambu with hot steamed rice.  We had it with yam fry and drumstick leaves curry.

Tuesday, September 13, 2016

CRISPY RAVA DOSA

Of late, I am seeing Jr.H is more with DH's trait, wanting to taste varieties at home even on weekdays.  He keeps giving me a list of recipes to be made at home.  Usually, I make Idly or dosa at home on weekdays as it would be easy to manage after tiresome working hours.  As today, Jr. H was at home for Bakrid holiday, I managed to rush home early to spend my evening hours with him.  As soon as I entered home, he asked me to prepare rava dosa at home as he is bored of Idly and dosa stuff.  Not to disappoint him, I prepared this recipe for dinner and managed to click some pictures for blogging purposes. (Kindly excuse me if the step by step pictures are not very clear as I managed to click in my mobile phone in urgency).  I would say I was able to satisfy his hunger craving as the dish came out perfect, super crispy.  This is a super easy recipe which can be prepared without any prior perfect planning.

Ingredients:
Rice flour - 1 cup
Rava/sooji - 1/2 cup
Maida - 1/4 cup
Peppercorns - 1 tsp
Cumin seeds/Jeeragam - 1 tsp
Thick Curd - 1 cup (mildly sour)
Salt - To taste
Coriander leaves (Chopped finely)
Green chillies  (Chopped finely)
Water - 2 cups

Preparation:
1. Mix all ingredients and add water and make this to a thin batter.  Set aside for 10 minutes.  The batter would slightly become thick and add little water to it before making dosas.

2. Heat dosa pan/tawa, when the tawa is hot, sprinkle some water and it sizzles.  This is the right consistency for pouring the batter.  Pour the batter from outside to inside as shown in the picture.  There would be lot of small holes seen and do not try to fill in with batter, just leave it as it is.  Add a teaspoon of oil around the dosa. Cover it with a lid and allow it to cook in low to medium flame.


3.  After 2-3 minutes, remove the lid to see if the bottom part becomes nicely golden brown. Remove it slowly using spatula/ladle.  There is no need to flip the dosa as the batter is thin and covered with lid.  The rava dosa would not be in perfect round shape but do not worry because the taste overcomes improper shape.

4. The crispy rava dosa is ready to be served with coconut chutney, sambar, and idly podi.


Note:  Mix the batter every time before you make your dosas and add little water to the batter if it has thicken.

Tuesday, August 23, 2016

Akkara Adisal/Akkaravadisal - Iyengar Style

Akkaravadisal is an authentic iyengar recipe which is offered as prasadham in many Perumal temple.  The texture would be of like jaggery-rice pudding.  Though the preparation would recall slightly of sakkarai pongal, this delicacy is cooked fully in milk with lots of ghee and would come out as rich, creamy, and smoother texture.  

Ingredients:
Raw rice - 1/2 cup
Moong dhal -  3 tsp
Jaggery - 1/2 cup (heaped)
Milk (Boiled) - 1/2 liter
Ghee - 6 tsp or more as desired
Cardamom powder - a pinch
Edible camphor (optional) -a pinch
Cashews - handful or as desired
Dry grapes/Raisin - handful or as desired

Preparation:
1. Boil half liter of milk and allow itself to cool.
2. In a heavy bottomed pan, add 2 tsp of ghee and fry the cashews and raisins.  
3. Later in the same kadai, fry the rice+moong dhal mixture until the rice flakes turn crispy and slightly brown.
4.  Add 1 cup of cooled boil milk + 1 cup of water and pressure cook for 5 whistles or until rice turns soft.
5. Once the pressure is released, mash the cooked rice+dhal mixture well.  
6.   Crush the jaggery, dissolve in very little water, strain out the dust and add it to the cooked dhal and mix well.
7.  Keep in medium flame and keep stirring.  Add the half of the remaining boiled milk in between and keep stirring.  The mixture tends to absorb all the milk and tend to thicken.  Add ghee in between while stirring.  Add a pinch of cardamom powder and edible camphor and keep stirring.  Add the remaining milk and stir continuously.
 8. Add the fried cashews and raisins finally and switch off the flame.  The dish should be in pudding consistency.  Keep in mind when you switch off the flame as it tends to thickens when it cools down.
9.  Offer to God and serve with love, it would taste divine..

Enjoy the lip smacking smooth, creamy, rich recipe and the taste would last for hours...

Monday, August 15, 2016

Gulab Jamun

Gulab jamun is the most popular and loved desert among many Indians.  I prepared this recipe with MTR Gulab jamun mix which is very easy and can be done in half an hour.  An ideal jamun would be soft, spongy and would melt in mouth and the taste lasts for a long period of time.  The flavor of cardamom with a pinch of edible camphor would give an addictive taste to this desert.


Ingredients:
MTR Gulab jamun mix - 200g
Sugar - 300 g
Water - 2.5 cups
Cardamom powder/cardamom essence  - a pinch or few drops
Edible camphor -a pinch
Oil - As required for frying

Preparation:
1. Open the MTR gulab jamun mix packet and transfer the contents (You can use any brand of your choice).  Knead gently well by adding water little by little.  The mixture should be kneaded into a soft dough and small soft balls could be made from it without any cracks (Refer picture).  Set aside for some time.

2.  Take 300g of sugar and add 2.5 cups of water to it.  Keep in medium flame stirring in between.  After 5-7 minutes, the sugar starts to boil and color changes slightly.  Let it boil for some 2 more minutes and at this stage add cardamom essence and a pinch of edible camphor to the  sugar syrup.  Maintain in flame for a minute and switch off the stove.

3.  In a heavy bottomed pan, heat oil and fry the soft balls in low flame until it is cooked well and turn golden color on all sides.  Please note while frying, the oil should be kept in low to medium flame, otherwise the balls would turn brownish outside but would not have cooked well inside.  Also fry the balls in small batches. 
4.  Put the fried jamuns in the sugar syrup and repeat the process for rest of the dough.  The size of the jamuns would increase slightly after getting immersed in sugar syrup.  
5.  Serve it warm or chilled as per your family taste.  Warm gulab jamuns are best when served with chilled icecream :-).